

How to get started on Chinese Calligraphy 3: STROKES
By Fei Gao on May 13, 2023
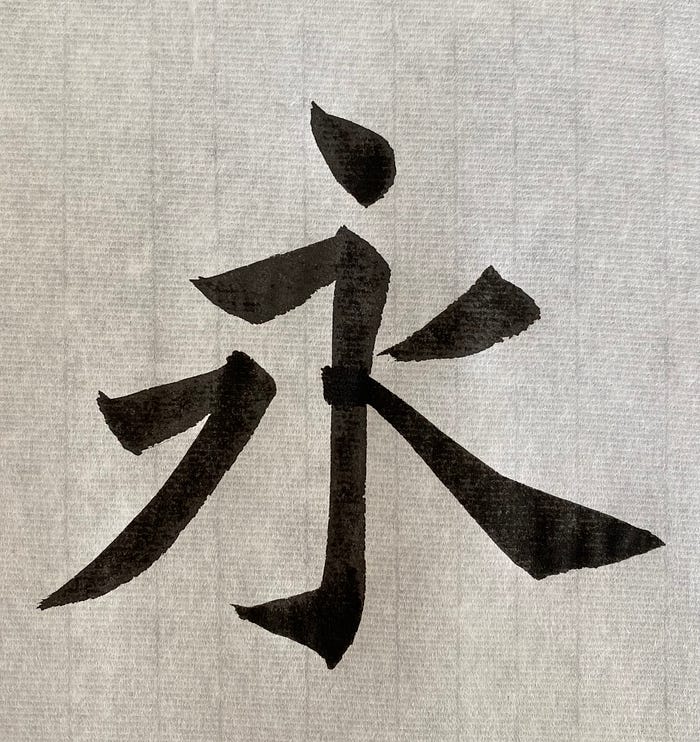
It’s finally time to start learning and practicing basic strokes in Chinese calligraphy! How very exciting. By the end of this lesson, you will have learned all 8 principles of Yong, and could piece them together to write your very first character. Yong(永)is a great entry point for people just beginning in Chinese calligraphy, as it is made up of the 8 most common strokes in Chinese characters, nothing less, nothing more. In the next post we’ll introduce the various types of scripts (styles) in Chinese calligraphy. But for now, just know that we are using regular script, which is the most commonly utilized script in modern day writing and prints, and a great place to start for beginners.
Before we jump into the individual strokes, just wanted to note that these are much harder to master than they look. Even a few years into learning Chinese calligraphy, I still had to keep practicing and improving these strokes. Often assignments by my teachers for a week would be to go home and repeat a particular stroke 100 or 200 times. So if they don’t look right on the first try, don’t get discouraged! Without further ado, let’s start learning them. Each one has a picture, short description, and video demonstration showing how it’s done.
Stroke 1: 橫 / heng

Written from left to write, you start by pressing the tip of the brush onto the paper, forming a roughly 45 degree angle, then change directions to drag out the stroke horizontally. Once you’ve reached the end, lift the brush up so only the tip is touching the paper, and trace around the end of the stroke (starting from the top, drag diagonally towards the lower right, then towards the lower left, and pick it back up) to seal off the rough edges. Note that the stroke gets thinner as it progresses towards the middle, and thickens again as it reaches the end. And when looking at the whole stroke, there’s a slight slant upwards towards the right.
Stroke 2: 豎 / shu

Written from top to bottom, you press the tip of the brush down onto the paper, and continue pressing the brush at a roughly 45 degree angle. It’s a similar technique as writing Stroke 1, but just working with different angles. You then change the angle of the brush, drag downwards to continue the stroke. Once you reach the bottom, seal off in a similar manner as Stroke 1, but starting from the lower left edge, pull down towards the lower right where you reach the bottom most point, then pull up while picking up the brush to complete the stroke. Once again, similar to Stroke 1, you’d notice that the middle of the stroke is the thinnest.
Stroke 3: 勾 / gou

The specific part “gou” is referring to is the hook at the bottom. Here I combined it with Stroke 2, as it’s the most common (if not the only) place that it occurs. The vertical part is done the same way as Stroke 2, the only thing to note is that when you end and seal off the stroke, you want the finish to tilt a bit more towards the left. Notice how in Stroke 2, if you draw a vertical line up from the bottom-most edge (sharp tip of) the stroke, the line ends somewhere in the middle of the stroke. Whereas when you want to add a “gou” to it, the line pretty much aligns with the left edge of the whole stroke. Once the vertical stroke is sealed off, start the tip of the brush somewhere around the lower left edge (NOT the bottom edge), press it down slightly, and slowly push the brush out towards the left while simultaneously lifting the brush bit by bit to form the hook. Basically you want the hook to be based and pushed out from the bottom left slant formed by the vertical stroke.
Stroke 4: 點 / dian

Starting with the tip, press the brush down towards the paper at a 45 degree angle as if you’re about to write Stroke 2. But instead of dragging the brush further down, simply pick it back up almost immediately after you switch the direction of the brush, and use the tip of the brush to seal off the “dian”, starting from the right most point, round it down, and pull it back up.
Stroke 5: 提 / ti

The beginning is the same as when writing Stroke 1— starting with the tip, press the brush down towards the paper at a 45 degree angle. But after you change the brush direction, instead of dragging it out towards the right, push it further up, and immediately start slowly lifting the brush up to end the stroke.
Stroke 6: 長撇 / chang pie

Start the stroke similar to Stroke 2 — press the brush down towards the paper at a 45 degree angle, starting with the tip. But instead of changing directions and dragging downwards, drag towards the bottom left at a roughly 45 degree angle instead. There’s a slight thinning in the stroke at the start and in the middle, but only reduce the width of the stroke at a faster paste towards the last 1/3 part of the stroke. Also make sure there’s a slight curve to the stroke, and not a completely straight line.
Stroke 7: 短撇 / duan pie

Similar to Stroke 6 above, the difference being the moment you start dragging towards the lower left, immediately start lifting the brush to finish up the stroke.
Stroke 8: 捺 / na

Now this is one of the most challenging foundational strokes. Start off similar to Stroke 1, but then immediate push upwards a bit, then curve down, as if you’re trying to draw the beginning of a circle. Once your brush is at a roughly 45 degree slant towards the lower right, start dragging the brush in that direction while gradually increasing the pressure, forming the triangle looking portion in the middle. Once you’ve reached where you want the bottom most part of the stroke to be, you then slowly push the brush towards the right, while lightening the pressure along the way to form that other triangle pointing out towards the right.
Practice Tips
Try to use a bigger brush and make the strokes and characters as big as you can (ideally about the size of your palm stretched out). Also start off slow — roughly half the speed of what you see in the demonstration videos above is a good place to start. Since each type of stroke is intricate and has many minute details to pay attention to, when you’re just starting off, it’d be hard to keep track and remember to execute each of them if you go too fast.
Challenge

Here’s the “Yong” character again. Now that you’ve learned all 8 strokes, can you recognize each of them and see how they are combined? Give it a try!
